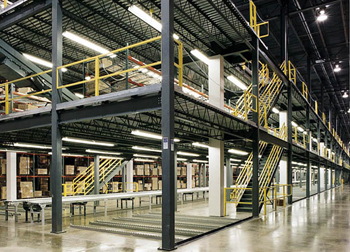
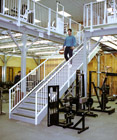
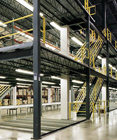
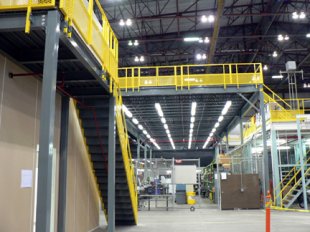
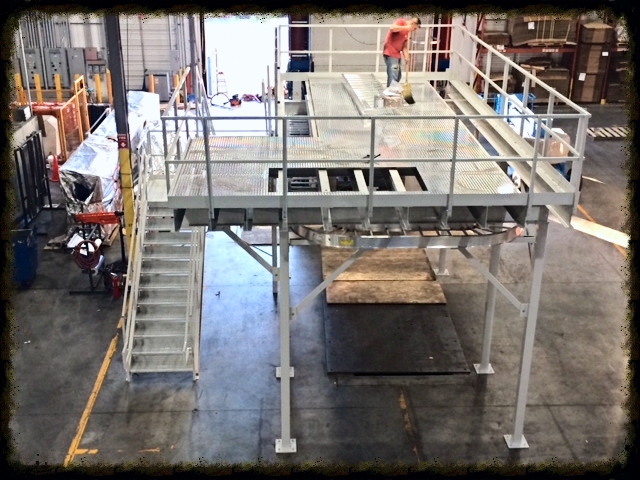
Heavy duty industrial platforms are excellent for supervisory inplant offices, metal range towers, vision towers and moreMezzanine-Built mezzanine systems from Panel Built, Inc. provide a clear view of plant work areas and convert wasted vertical space into productive work environments.
Ideal for:
Inplant Offices
Operating Spaces
Storage
Industrial Platforms
Catwalks
Conveyor Integration
These rugged load-bearing mezzanine systems support two-story construction and can meet military specs MIL-B-28658D. Additionally, Mezzanine-Built systems can be designed to accommodate virtually any space requirement.
Mezzanine-Built powder coated steel mezzanines are built to your specificationcustom sizes, heights, spans, decking materials, landings and stair systems. Heavy-duty and long-lasting, Panel Built provides the safest, lowest-maintenance, and most productive 2-story metal structures available today.
Mezzanine-Built Mezzanine Systems feature:
Modular bolt-together systems
3-point connections vs. in-shear
A variety of decking materials
Metal Railing with 4" kick-plate
Heavy-duty columns & baseplates
All structural grade bolts
Heavy-duty prefabricated metal stairs and accessories
Abrasion-resistant powder-coated steel or aluminum panels
Vinyl covered gypsum panels provide low maintenance and an aesthetically pleasing no-strip appearance
Doors and windows carefully selected for quality and performance
4-MIL powder coated steel components provide a superior level of durability against abusive, corrosive applications
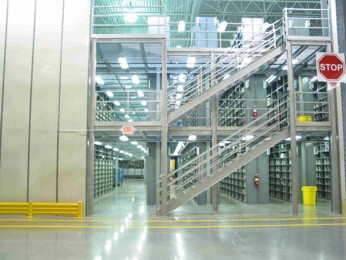
Free-Standing Custom Mezzanine in Salt Lake City for applications that either require custom fitting to specific shape, size or height requirements or Mezzanine that require longer spans while retaining a load rating of up to 150 pounds per square foot. Structural steel components are used, and a variety of deck options are available such as Channel Lock Safety Grating, bar grating, 1-1/2" B-Deck with plywood and diamond plate.
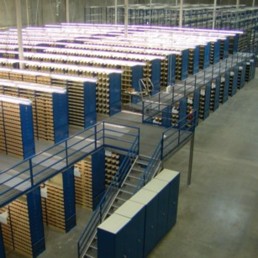
High Rise Shelving and Mezzanine
Mezzanines come in many types. The most common are those supported by Clipper® or Erectomatic® shelving. These can have up to 3 levels, and utilize safety grating or other materials as a walking surface.
Pallet Rack, Wide Span and RivetRite can also be used for multilevel installations.
Stairs and landings are available for all Mezzanines.
Our highly trained designers will take the measurements of your space, and assure you get the most possible storage Simple to complex solutions for all forms of Mezzanine and shelving, including sophisticated multi-level and modular applications.
Unparalleled Experience 801-328-8788 or 866-328-5066
With decades of hands on design, installation, and manufacturing experience, no other shelving company has the expertise to match that of NationWide Shelving. We have installed thousands of Penco shelving systems all over the nation. We understand the storage challenges you face, and have designers ready to create innovative solutions.
Panel Built News
Great News! Section 179 Benefits for Modular Building Extended!For 2013, but the limit has been increased to $500,000! New measures also allow a business to retro-actively file for Section 179 write-offs for the 2012 tax year.
This is a profitable offer on all Panel Built modular offices, portable buildings and mezzanines. Thanks to Section 179, these products qualify for a 5-year depreciation period, while conventional construction is depreciated over 39 years.
One of the most common ways to increase floor space without building a new facility is to create an intermediate level by constructing a mezzanine. Mezzanines can be designed in many different fashions; structural steel, cold rolled steel, wood, free standing or integrated to name a few. No matter what design you choose, one of the biggest decisions when building a mezzanine is the type of decking (or flooring) to utilize.
Quality and Value
Penco
MEZZANINE-BUILT — I N S T A L L A T I O N G U I D E L I N E S
Preliminary Job Review
1. Thoroughly review the instruction manual and the installation drawings. The installation drawings are
placed in the hardware box shipped with the mezzanine structure.
2. These instructions are intended for personnel experienced in the construction of mezzanines.
3. The safety precautions used during erection are the responsibility of the installer. OSHA guidelines
are suggested.
4. Make sure you have all necessary tools. Refer to tool list included in this manual.
5. Make sure all safety guidelines are followed.
6. Site Check. Verify that there are no obstructions to hinder erection of mezzanine.
Receiving and Unloading of Materials:
Upon arrival of the shipment, you should always:
1. Verify that all the required pieces for installation were shipped to the job site. A “Bill of Materials” is
shipped with the mezzanine. Contact Panel-Built immediately if there are any discrepancies between
the “Bill of Materials” and actual shipped goods.
2. If merchandise is delivered in damaged condition, do not reject shipment. Any damages or shortages,
actual or potential, must be noted by the driver on the freight bill. Purchaser must notify Panel-Built
within 10 days of any freight damages. Damaged merchandise and packaging must be retained by
purchaser until inspection by carrier and / or Panel-Built. Panel-Built shall not be responsible for any
losses sustained due to purchaser’s failure to comply with this freight claim procedure. Panel-Built’s
invoice must be paid in full when due, irrespective of pending freight claim.
3. Move all mezzanine components to the area of assembly. Arrange the pieces on the floor so that the
identification codes are easily read.
Tool List
25’, 50’, 100’ Rulers
Chalkline
Markers
Six Foot Levels (2)
Hammer Drill
Socket Wrenches
Impact Wrench
Screw Guns
C-Clamps
Circular Saw
Saws-All
Fork Lift
Mechanical Lift
Ladders
2 Pound Hammer
Shop Vac
Paint Brushes for Touch-Up
Pry Bars
Spud Wrench
(continued on back)
Recommended Minimum Safety Equipment
Protective Eyewear
Steel-Toed Shoes
Gloves
Hearing Protection
Hard Hat
General
Installation
Instructions
Installation of Mezzanine System
Columns
Listed below are some guidelines for the installation of the columns and beams. Remember that this is an
overview and that all mezzanines can differ in construction. Please remember to consult the actual drawings
sent with your specific mezzanine. As an installer, you will want to select a starting point for the mezzanine.
This will in most cases be the critical area, such as next to adjoining walls.
1. Locate the starting point.
2. Using the floor plan included with the mezzanine shipment, mark out location of all columns. Dimension
lines on the floor plan are to the center line of the columns. Check layout for square by using the
6-8-10 triangle method. Or on larger projects use equal dimensions for diagonal measurements. Begin
the installation of the columns at the starting point.
3. Install the column at the starting point. All columns are marked on the floor plan and on the base of the
column with a column number. Columns are designated with a “C”. Pay close attention to the column
top orientation so that it will accept the other framing members. Use the wedge anchors provided to
anchor the column. Do not anchor the column until it has been checked for plumb by using a six foot
level. Check for plumbness by using the six foot level on two adjacent sides of the columns. Columns
should be plumbed by using shims or high strength grout.
4. Install the anchor bolt by using a hammer drill to drill a hole the same diameter as the anchor bolt.
Thoroughly clean the hole removing all dust and debris. Drive the anchor bolt into the hole so that
1-1/4” of the anchor bolt is exposed above the slab. (Note: Place nut and washer on anchor bolt
when driving into the slab.) Use a flat washer followed by a lock washer when tightening the nut on the
on the wedge anchor. Tighten the nuts finger tight, then two or three additional turns to achieve proper
torque.
Beams
1. Locate main beams and intermediate beams by matching the piece marks on the beams to the piece
marks on the drawings. Beams are designated with a “B”. The orientation of the beams can be deter
mined be placing the piece mark on the beam in the same location the piece mark is located on the
drawing. The beam piece marks should all be visible from the top of the mezzanine.
2. Connect the beams to the columns with the 1/2” X 1-1/2” bolt. There should be a flat washer next to
the bolt head with a lock washer next to the nut. If you have a seated connection welded to the
column, use the 1/2” X 1” bolts.
Bar Joists
1. Locate the bar joists by matching the piece marks on the joists to the piece marks on the drawings.
Bar Joists are designated with a “J”. If there is only one type of Joist, individual joists will not be
marked.
2. The ends of the bar joists sit on top of the main beams.
3. Connect the joists to the beams using the 1/2” X 1-1/2” bolts, nuts and washers. A total of four bolts
per bar joist is used, two on each end. Beams and joists are predrilled.
4. Install the bridging angle perpendicular to the bottom chord of the bar joists. The bridging angle is to
be attached to the bottom chord of the bar joists with TEK Screws. Use one screw through bridging
into each joist. Number of rows of bridging angle will be shown on drawing.
KickPlate
1. The kickplate material is a 14 gauge material bent at a 90 degree angle with a four inch leg and a
6-1/2” leg.
2. Kickplate is to be installed with the four inch leg placed on top of the steel beams and joists and
below the decking material.
3. The 6-1/2” leg acts as a cover for the corrugated deck and plywood or other decking material. The
6-1/2” leg goes in the vertical position, the 4” leg is horizontal.
4. The kickplate is to be fastened to the steel beams and joists when the decking material is installed.
5. Sections of the kickplate line up end to end.
6. Reverse one section of kickplate at the gate section to serve as an edge protector for the decking
material. (This section is screwed down on top of the decking instead of underneath.)
Corrugated Deck
1. Lay out all decking material as shown on decking layout plan.
2. As a caution, do not place the entire stack of plywood in one location on the mezzanine. The
plywood is heavy and must be spread out in several stacks as not to overload the beams and joists
during construction.
3. Starting at one side of the mezzanine, position the decking aligning the side of the decking with the
edge of the mezzanine. (At this point, the kickplate should be installed beneath the decking.)
4. Verify that all laps of the decking occur over a beam or joist.
5. If white decking is used, make sure the white side is on the bottom.
6. Fasten decking to the structural steel beams or joists using TEK 5 screws placed in parallel rows at
one foot centers on all beams perpendicular to the decking span and all perimeter beams.
7. Proceed with the next piece of decking, nesting it into the edge of the first piece of decking. Make
sure it is parallel to the first piece of decking.
8. Fasten as before and continue until all decking has been installed.
9. When you get to the end of the mezzanine, either increase the nesting or cut the remaining deck to
the beam edge.
Plywood
1. Layout all plywood as shown on the plywood layout drawing.
2. The plywood runs in the opposite direction as the corrugated steel deck.
3. The rows or plywood are staggered so the joints do not line up.
4. As a caution, do not place the entire stack of plywood in one location on the mezzanine. The
plywood is heavy and must be spread out in several stacks as not to overload the beams and joists
during construction.
5. Attach the plywood using grabber screws. Use forty screws per sheet of plywood. Lay the screws
out in eight rows of five screws each.
6. All plywood screws are to be placed in the top ribs of the decking material.
7. Keep all screws one to two inches from the edge of the plywood.
Serving these Cities in Utah
Altamont, Altonah, American Fork, Highland, Alpine, Bonanza, Bluebell, Eagle Mountain, Eagle Mtn, Lehi, Bingham Canyon, Bingham Cyn, Copperton, Bountiful, W Bountiful, West Bountiful, Woods Cross,Coalville, Wanship, Cedar Valley, Cedar Fort, Fairfield, Centerville, Clearfield, Clinton, Sunset, West Point, Croydon , Draper, Duchesne, Bridgeland , Dugway, Terra, Dutch John, Red Canyon, Echo, Farmington, Fort Duchesne, Gusher, Ouray, Fruitland, Garden City, Grantsville, Lakeside, Skull Valley, Virgin, Springdale Pine Valley Veyo, Brookside Dammeron Valley Hildale Tropic Mount Carmel Paragonah Newcastle Panguitch Bryce, Bryce Canyon, Bryce Canyon City, Toquerville Torrey Rockville, Santa Clara New Harmony Orderville Parowan Summit Teasdale Springdale, Zion National Park, Zion Ntl Park Duck Creek Village, Duck Crk Vlg Sevier Monroe, Austin, Central Valley, Central Vly Modena Minersville Milford Marysvale Lyman Loa, Fremon Leeds Glenwood Greenville, Adamsville Greenwich Gunlock Hanksville Hatch Henrieville Hurricane, Apple Valley Ivins Joseph Junction Kanab, Big Water, Canyon Point Kanarraville Kingston Koosharem La Verkin Central Circleville Elsinore Enterprise Escalante Garrison Glendale Beryl Bicknell Boulder Cannonville Brian Head Cedar City, Enoch, Pintura Beaver Alton Annabella Antimony Hanna Henefer Heber City, Daniel Ibapah, Callao Jensen Kamas, Francis, Hideout Kaysville, Fruit Heights Laketown Lapoint Layton Richfield, Venice
Serving These Counties in Utah
Duchesne County, Utah County Salt Lake County, Uintah County, Davis County, Summit County, Morgan County, Salt Lake County, Duchesne County , Tooele County, Daggett County, Davis County, Uintah County, Duchesne County, Rich County, Rich County Duchesne County Weber County Summit County Tooele County Duchesne County Davis County Sevier County Kane County Iron County Washington County Kane County Garfield County Iron County Sevier County Wayne County Beaver County Piute County Sanpete County Uintah County Daggett County